The first article: About the sequence of actions and the number of actions
Players on the current trajectory will definitely find that when you select the current command for the character, DELAY plus a number will appear in the upper left corner. This is a very important point in the trajectory series combat system: the action sequence system.
Everyone must have encountered a situation where the enemy moved after I played a bunch of S skills. Even if the combat system of the trajectory series eliminates those who change the order of action, blasting S, and delay, it is not purely turn-based, nor does it determine the order based only on the speed attributes of the characters. Because in the trajectory series, each action has a different time. The specific performance is that when you use different combat skills, the DELAY value displayed in the upper left corner is different. You can understand it as the back sway of the skill. We call it hard straight (or called hard straight). Stiff). So how is this time calculated, and how does it affect the sequence of actions?
First of all, let's talk about how the DELAY value is calculated. The value of this DELAY is called Action Time (AT). Simply put, the order of action is determined by AT. When AT=0, the character can take the turn to act, and the AT time will be accumulated after the action. When a character finishes acting, you can imagine in your mind that the ATs of all characters flow forward simultaneously until the character with the smallest AT becomes 0, and then a new round of action is entered. This is how the flow of time works. Regarding the circulation of AT, you can observe through this video BV1SW411w7aR.
Each action has different rigidities. The following examples illustrate the impact of different actions on AT.
Example 1: For example, the wind is 30, and the character has its own speed. For example, the current value is 151. Then the DELAY value is calculated by 100×30÷151 and then rounded up (not rounded), you can get 19. Therefore, when it's Lien's turn to act, after releasing the wind, the AT will increase by 19. According to the current value of other characters, from small to large, it will be inserted into the entire action queue.
Example 2: Similarly, we can know that when Richard’s SPD is 234, since Light Demon Slash’s rigidity is 7, 7×100÷234 is rounded up = 2, so the rigidity time after the action is extremely short, so it is inserted into the team. China is still the number one, so it can continue to send several times in a row.
In common actions, Kong Lingbi’s movement is 20 and the use of props is 20; the normal attack is 30, the flash rails 1 and 2 are used to move 15 hard, the use of props and normal attacks are 20; the flash 3 and 4 are moving and The props are straight 10, and the normal attack is 20. Combat skills vary from strength to strength. Generally, the strength of S skills is higher, and magic is divided into two periods. You can understand it as forward and backward. The forward motion is the driving time from the start of the magic command to the completion of the magic drive. The time is hardly the time when the magic is released until the next time it can act. Generally, magic is different according to its power characteristics, and the two periods of time are different. Auxiliary magic usually drives relatively short, hard and long, on the contrary, attack magic drives long and hard and short. You can refer to the magic warfare data table on this site.
Hard straight time and magic drive time will also be affected by certain circuits or accessories. For example, the core circuit lion (king) in the trajectory of the flash can make the hard straight time of the S skill halved, while the Taurus and knitting (running) can increase the hard straight time of the normal/combat skill/S skill. The driving circuit and some accessories can reduce the magic driving time, and some core circuits and bells can reduce the hard time of the magic. Different games have different calculation methods. Give a few examples to illustrate the calculation methods of these times:
Example 3: In Kong Zero Bi, each person can only bring one drive. For example, drive 2 of Bi Rail has a drive time of -33%, and the drive time of a magic with a drive of 12 (such as Void Fantasy Domain) is calculated as follows: 12×33% And rounding = 3, 12-3=9, the driving time of magic can be counted as 9 with the addition of driving 2. If Lloyd’s SPD is 127, AT is calculated as 9×100÷127 rounded=7, if SPD is 129, AT is calculated as 9×100÷129 rounded=6.
In the flash rail, there are multiple drive circuits and accessories. And Falcom found that the previous calculation method is not very scientific, because for the magic with a drive of 12, there is no difference between driving 1 minus 25% and driving 2 minus 33%. Therefore, the drive reduction time is adjusted and reduced on the basis of the AT value brought by the drive.
Example 4: The drive time of flash rail 1 is calculated as follows: Assuming that drive 1 and drive 2 are brought together, the drive time is reduced by 10% and 15% respectively, and the sum of the two is reduced by 25%, which is equivalent to the drive time becoming 75%. Assuming that Emma’s SPD is 133, the AT after a magic with a drive of 10 (such as dark matter) is calculated as follows: 10×100÷133 rounded=7, 7×75% rounded=5.
There are also some bells in Flash Rail 1, which can reduce the hard time 50% of certain magic. The calculation method is the same as above. It is worth mentioning that the effect of part of the core loop also includes reducing the hard straight time 50%. Like the drive, the two are first added to reduce the total amount of 100%, and then the hard straight time becomes completely 0, which is in line with Bizhi's trajectory. The bell has the same effect.
Example 5: For another example, the SPD of Philippines is 252 (168+SPD50%) when the BUFF is full, then if Philippines brings a driver 1 to reduce the driving time of 10%, and at the same time brings a full-level civet and black bell, one driver is 5 The calculation of AT after magic (such as time drive) driving is as follows: 5×100÷252 rounded = 1, 1×90% rounded = 0, no driving time is required. And because the full-level civet cat and black language bell each reduce the hard straight time by 50%, the sum of the two reduces 100%, which is equivalent to the hard straight time becoming 0%, no matter how the character SPD, the magic hard, do not need hard straight time. Therefore, Fei in this state can cast "Time Drive" and "Time Blocking" indefinitely.
Starting from Flash Rail 2, multiple drive circuits/accessories reduce drive time, and multiple bells to reduce hard straight time have changed from stacking to stacking algorithm. Specifically, if the effect of drive 1 is to make the drive time 4/5, and the effect of drive 2 is to make the drive time 3/4, then the two contemporaries are equivalent to the drive time becoming 4/5×3/ 4 = 60%, then use the same method as above to calculate. With the core loop and bell at the same time, it is 50%×50%=25%, which is equivalent to the hard straight time becoming 25%, and then use the same method as above to calculate.
It’s worth noting that the previous situation where both the drive and the rigidity are 0 can also be achieved in Flash 3 and 4. However, some corrections have been made during the later patch update of the Flash 4. The Flash 4 stipulates that the rigidity calculated according to the previous calculation is at least 1. If it is 0, it will be corrected to 1, so under normal circumstances, it cannot stay in place forever. However, the courage command system has been added to the flash rails 3 and 4, and some courage commands can also reduce the rigidity. The calculation method is based on the previously calculated rigidity, and then multiplied by the corresponding magnification. Therefore, if the hard straight can be reduced to 1, open any courage command to reduce the hard straight, even if it is 0.9 times, it is the same as the driver 1 in Example 5 above, because the effect of calculating the instruction once more, 1×90% rounded = 0, infinite actions can still be achieved during the duration of the command. In the latest version of Trajectory of Creation, it has been weakened again, unless the skill itself is 0 drive or 0 hard straight, or the command drive time multiplier directly becomes 0 (Torval), otherwise the minimum drive and hard straight time will be 1.
In addition, the bell system of Flash Rail 3 has a bug. We know that there are two types of bells for each attribute in Flash Rail 3, one of which is a more advanced version that includes damage, and the core loop to reduce hard time. Of course, these three can be superimposed, so theoretically the hard straight time can become 12.5%. But it's actually more terrifying than this. Experiments have found that if you wear multiple high-level bells, the reduced rigidity of these bells can affect the magic of other types. Flash 4 returns to normal, and can only affect a certain series of magic drives as described.
Example 6: If the force director of a character in Flash 3 puts a full-level hero (yingjie), Huoyanling, Jinyanling, holy world bell, and starfish bell, then the calculations for each element of magic are as follows:
Earth, wind, time, illusion: no loop has an effect on reducing rigidity
Water: Starfish Bell-50%, Holy Realm Bell-50%, the hard straight time becomes 25%, the damage bonus is 30%
Fire: Since there is no high-level flame star bell, other high-level bells cannot add to the fire system, so the only effective ones are Yinghao-50% and Huoyanbell-50%. The rigid time becomes 25%, and the damage bonus is no
Empty: Holy Realm Bell-50%, Jinyan Bell-50%, Starfish Bell-50%, the hard straight time becomes 12.5%, the damage bonus is 30%
Therefore, under the BUG of Flash 3, the mage is very scary. With a lot of high-level bells, and with the Kagura formation, you can achieve a magic machine gun with multiple systems. The only drawback is that the magic does not save BP, but you still have to cooperate with physical hands to break and save BP.
It is worth mentioning that the speed and smoothness of the nightmare riding god battle is very dependent on the number of actions. The riding god action can quickly accumulate BP, and the auxiliary hand can also release more suitable auxiliary magic at the right time. In addition to the importance of SPD, you should also pay attention to casting high-hard and straight combat skills as little as possible, such as partial interruption skills, group skills, and it is easy to cause multiple linkages after casting. Unless for the purpose of DEBUFF, interrupting the drive of important skills, and bursting output, usually try to use the general attack output as much as possible. The auxiliary can make use of Fei's auxiliary magic (+SPD, the magic itself is extremely low), and the auxiliary magic of Macias and Yuna (the person, plus BUFF, itself is extremely low). If not necessary, try to avoid using some group auxiliary magic that is more than 3 times harder (such as increasing blood). Fast and effective output can greatly reduce the time spent on defense, and effectively improve the rhythm of riding a war, instead of being tired of defense and recovery due to slow speed, and falling into a vicious circle, although it is not impossible to fight, it is best not to Fighting so frustrated. In Flash 3 and 4, multiple support characters share one action slot and take turns. The SPD is fixed but it is also benefited by the speed orb. Therefore, if you want the next support character to come up quickly, the first few support Characters must use short, hard and straight skills, such as using general EX magic output or these extremely low hard and straight auxiliary magic mentioned above (I think the design of Riding God Fight is problematic. After two units are dead, support the characters. It is three times the action power of the body. To a certain extent, although it is slow, it is better to play). In addition, the declining moon/defense fixed AT in the God of Mounting War has nothing to do with the SPD of the God of Mounting, so don't miss the speed orb, speed support and speed buff because of this. Instead, this SPD-related skill can be used to adjust the sequence of actions with other SPD-related skills to maximize their defensive effects.
In the AT system instructions in the upper left corner after the zero track, in addition to your own AT when casting a skill, if you cast a combat maneuver that delays and raises people, or a combat maneuver that affects multiple people's AT, such as a chain combat maneuver, the system will also Indicate what value of AT will be if other characters are affected (of course, the probabilistic delay will not change if it does not succeed). The value next to this DELAY is the accumulated value of the current AT value plus the affected value. For example, under the delay flow, we can see that the DELAY value of an enemy is as high as several hundred, accumulating and passing by again and again, and finally there is such a high AT, which has not been able to come up.
Another point is that if a character's AT for this action is the same as the current AT of someone in the queue, then this person will be ranked first when he jumps in the queue. This point can sometimes be used to precisely control the sequence of actions. For example, if two people have SPD and explode S together, then the person who put S first will fall behind the person who put S later. After the combat skills of AT to raise people, the same will be maintained. The order in which the S technique jumps into the line. This allows the order of actions of the two in the next round to be exchanged, so that the best order of action can be arranged according to tactics at some point. Of course, Time Blast, OverRise, and Blast Spirit have their own mechanisms. Among them, Explosive Spirit is stronger than OverRise. In Explosive Spirit, after 6 rounds of action, the character is still 0AT, and OverRise's actions will generate AT, so the increased action ability of Explosive Spirit is far greater than OverRise.
Regarding the AT and sequence of the opening of the battle: The sequence of actions at the opening is determined by a variety of factors plus random disturbances. Basically, the larger the SPD, the easier it is to act earlier, the higher the character number in the game, the easier it is to act earlier (such as Lloyd>Ellie>Tio>Randy), the higher the character queue, the easier it is to act early ( For example, the leader of the team is easy to act early), the opening game will give everyone a certain random hard straight, and then form the opening AT according to the SPD. However, this random disturbance flash track is very large, so the opening sequence of the flash track is basically difficult to control by yourself, but the probability is always better if you know the principle. Of course, at the beginning of some battles, the AT is fixed, such as a common enemy attacking first round.
Finally, the flash track started the new substitution system. The substitution will cause the replaced character to increase the 25%'s rigidity in the first action, and it will also consume the BUFF of the replaced character for one round, but in general, it will affect It's not very big, and the same is true of Mount God Fight.
Part 2: Attack attributes, BUFF calculation, damage calculation, etc.
The damage calculation of the trajectory series can basically include five parts of bonus/reduction. Let's discuss them separately:
1 Basic attributes and BUFF calculation:
Refers to the basic attributes of attack and defense. Note that the trajectory distinguishes attack magic (guided magic Arts), physical attack (general attack, combat skill Craft, S-Craft, etc.), magical damage (Magical) and physical damage (Physical).The basic attacks of most characters belong to physical attacks. Physical damage depends on our STR and enemy DEF. Except for some magical characters, including Tio, Elliott, Emma, Tova, Second Sister, Miao Jie, etc. are physical damages. Attack magic damage depends on our STR and enemy ADF; as well as special characters Flash 2 chapter Alfin (LINK attack), Flash 4/Chuang Serenu’s normal attacks are special attack magic instead of physical attacks, look at me ATS and enemy ADF, but still belong toPhysical attack typeNormal Attack.Combat skills/S skills, etc. are all physical attacks. The type of damage depends on whether there is attack or magic attack in the combat skills description (this should be understood as magic damage). Therefore, the former depends on our STR and enemy DEF, and the latter depends on our ATS. And the enemy ADF. Guidance magic belongs to attack magic, magic damage, depending on our ATS and enemy ADF. It is worth noting that the gain of some loops will indicate whether the increase is based on damage judgment or attack type judgment. For example, the magic box (treasure box) and Hades increase the damage of attack magic, which is only effective for guiding magic; the overbearing, red lotus, and Taurus increase the damage of physical attack type, which only includes basic attack, combat skills, and S Skills, etc.; the sage increases magic damage, which is effective for both the guidance magic and the combat skills of magic damage; the spiritual principle reduces the magic damage, increases the physical damage, and is effective for both the guidance magic and the combat skill reduction of magic damage. , Basic attacks and combat skills against physical damage have the side effect of increasing damage.
In addition, physical defense, physical reflection, magic reflection, magic absorption, magic avoidance (core circuit, magic defense circuit, etc.) are generally used to determine the type of damage (physical damage or magical damage), regardless of the attack type, so 1 The secondary magic anti-shield can be dispelled with the basic attack of the guiding force account character at a minimum cost. The only exception here is that in Track of Zero, the CRAFT GUARD and ARTS REFLECT were designed for the first time. Since the program mechanism has not been unified with others, the physical defense wall in this work is only for physical Attack takes effect (normal attacks and combat skills, including physical damage and magic damage combat skills, such as all physical and magic damage combat skills taught), magic reflection shield only takes effect on channel magic, and cannot take effect on magic damage combat skills, but All special enemies with its own physical reflection/magic reflection/physical absorption/magic absorption characteristics in the empty orbit and zero orbit, as well as the reflection effect of the magic mirror/magic mirror, and the magic immunity effect of the root barrier are all in harmony with the body. Principles and spiritual principles are uniformly judged according to the type of damage (there is an interesting special case here. Under the effect of the root barrier in the empty track and the magic counter, the BUFF effect on the unit with the effect will also be affected by magic. Immune/bounce back, only the recovery magic will not be immune/reflect, or if you only use magic for yourself, the BUFF can still be bounced back to you successfully). From the path of Bizhi, all physical and magical defensive shields, reflection and absorption mechanisms have been unified, and they are all determined according to the type of damage (for example, Qijie’s earth bombing hammer can be rebounded with a magic anti-shield, and physical defense The wall will still be damaged, of course, a complete defense wall can definitely be hard to eat), so in fact, the words CRAFT GUARD and ARTS REFLECT in the battle between Birail and Shan/Chuangrail should actually be corrected to PHYS GUARD and MAGIC REFLECT.
Different from defensive shields, reflective shields, and absorption, the evasion is the hit, evasion attribute, hit rate, and evasion rate (including darkness, mind and eye bonus or reduction) displayed on the common attribute panel, depending on physics. The type of attack (general attack, combat attack) rather than the type of physical damage. As for the extra attribute of magic avoidance, as summarized in the previous paragraph, like magic absorption, it is judged based on the type of magic damage being avoided/absorbed, because we can think that the force magic attack is the same as the S skill, and magic avoidance/ Absorption is to judge the magical damage granted after being hit, and the combat skill attack of magical damage can also enjoy this judgment. Therefore, if the character is attacked by magical combat skills and can enjoy the above two evasion judgments, first use the physical attack evasion judgment. If there is no evasion judgment, you can also enjoy a magical damage evasion judgment when receiving damage.
Special attention is that for Lingbi's combined combat skills, the average attack attribute of the two characters needs to be looked at, which depends on the damage type of the combined combat skills. For example, for magical damage combo combat skills such as Void Star, look at the average ATS of Ellie and Vagi and the enemy's ADF, and for physical damage type combat skills such as Hook Blade Storm and Explosive Artillery, look at Tio and Randy respectively. And the average STR of Tio and Noelle (Because Tio's STR is very low, there will be a certain disadvantage, but the skill damage modifier is higher). As for the coordinated skills of riding a god war in the flash track, it has nothing to do with all characters. Don't look at the animation effect. In fact, it only depends on the caster's riding god attack attribute, so you need to choose a character with a higher attribute to cast the damage. Higher, of course, the ability to attack with Miao Jie's magic sometimes has a miraculous effect.
In addition, the attribute value is divided into two parts, one part is the original attribute value brought by the character's own level growth, and the other part is the additional attribute value brought by the loop equipment. Of course, there is a third part in the battle, that is, the impact of BUFF/DEBUFF, which we will discuss later. It is necessary to distinguish between these parts because in the previous attribute value calculation of the flash track, the influence of different parts is different.
First, in the empty track FC, the percentage of attributes added by the circuit is calculated based on the original attribute value and the total value of the attribute value brought by the equipment accessories. The empty track SC/3rd, the zero track/bi track are calculated based on the addition of the original attribute value.
Example 1: Xiao Ai FC final chapter STR201, in which weapon 90, attack 3 can increase 15%STR, 201×15%=30, then change from 201 to 231; in the trail of zero, Lloyd's 40-level 323STR, of which the original STR is 143, and the weapon is 180STR , If wearing attack 3 increases by 9%STR, the increased value is 143×9% rounded = 12.
Then when it comes to attribute values, we have to mention things related to BUFF and DEBUFF. From the empty track FC to the blue track, the attribute value addition and reduction of BUFF are calculated according to the original attribute value. When it comes to the trajectory of the flash, it is calculated according to the full value of the attributes including the equipment and the circuit bonus. Therefore, it is also SPD+50%, the bonus effect of the empty track and the flash track are completely different. It can be considered that the BUFF effect in the flash track is far more important than the empty track. In the empty track, since the character's basic ADF is only 15, the A crystal protection becomes the most garbage auxiliary magic, because the ADF can only add 7 points.
Example 2: The trail of the sky 3rd final chapter Richard 150 SPD original attribute value 80, through the black pearl loop bonus (+50% original attribute value) 40 points, 1 clown badge 40 points, cute cat suit 30 Point, 10 points for cute cat slippers, totaling 200 points. After adding the time acceleration change, SPD can also increase by 80×50% rounded = 40, and the actual SPD in the final battle reaches 240.
In the final chapter of the trail of SEN, the original SPD attributes, equipment, and circuits can be accumulated to 168. After stacking two layers of time driving in the battle, the SPD can be increased by 168×50% rounded = 84, and the actual SPD in the final battle reaches 252 .
For the enemy character, because there is no weapon or circuit actually equipped, the original attribute value can be equal to all of its own attribute values. However, one thing to note is that the enemy's attribute value will change under different difficulty of the trajectory, but the original attribute value is calculated according to the Normal difficulty when calculating the BUFF.
Example 3: Suppose an enemy in the empty trail SC has an SPD of 50 under Normal difficulty, and an SPD of 1.83 times 91 under Nightmare difficulty. After adding the time deceleration DEBUFF to it, the SPD drops by 50% and calculated as 50×50% rounded = 25. The final SPD of the enemy on Normal difficulty is 25, and the final SPD on Nightmare difficulty is 66. Although the reduced value is not that powerful, you still have to DEBUFF the enemy, otherwise such a high value will not be able to deal with it properly. After the deceleration, we may barely keep up.
Talk about a few special cases:
Guiding armor in the path of the sky
Although the attributes of the guided armor are calculated based on the attributes of Tida. However, the skill mechanism of the guided armor is the total value after adding Tida's original attribute value and the equipment circuit attribute value, and converted into the original attribute value of the guided armor. This makes the force-guided armor much stronger than the general role in some aspects. For example, under the equipment circuit similar to Richard, if the SPD reaches 180, the original attribute value of Tida will be 180 after being converted to guided armor. After the time change, it will be 270 SPD, forming a terrifying action force. The same effect of strengthening the sound force to the guidance armor is also very obvious, and its output will be much higher than other characters. Of course, Gundam also has negative effects: Gundam comes with immunity to poison, freezing, petrification, sleep, breathlessness, body shape changes, other abnormal states (including death), low ability, AT DELAY, etc. are not immune and cannot be affected by equipping accessories. . All weapons/armor/accessories/circuits, except for changing the ability value, are invalid (fight soul, stand-in, happiness stone, strange thieves cloak, immunity status, nuisance, blade, theory, intelligence, luck, skill, Yaomai , Absorption, etc. etc.)
The HP of the guided armor = the total HP of Tida × 2
The basic STR attribute value of the guided armor = the total value of Tida STR × 1.2
The DEF naked value of the force armor = the total DEF value of Tida × 1.2
The SPD naked value of the force armor = the total SPD value of Tida
The other abilities of the guided armor have nothing to do with Tida, ATS=0, ADF=0, AGL=0, DEX=100, MOV=8, RNG=0
The BUFF mechanism of the zero-bi combo combat skills
The BUFF of Zero Bizhong's combination combat skills does not need to be used by both characters, nor is it who should cast it to whom, but each combination needs to be used in a specific role, including the loop gain mentioned later. They are also settled on specific characters (in special cases, Yaomai and Scepter are related to the attacks of the two, but usually one of the attacks is the main one. Fortunately, longan, etc., it depends on whose actions are killed. Next). Generally speaking, the priority of the role is Lixia and Dudley> Lloyd> Allie> Tio> Randy> Noel> Vagi, and the special situation is that Noel has a higher priority in the heart of brave and needs to be settled. Noelle's BUFF. It should be noted that the combined combat skills of Ellie and Tio, and Ellie and Vagi require Ellie's ATS BUFF, and the combined combat skills of Tio and Vagi require Tio's ATS BUFF. All other combined combat skills are Look at the STR BUFF of the higher priority person. The value of BUFF increase is also based on the STR/ATS attributes of the higher priority people, not based on the average value. Therefore, the combination of physical attack skills like Maoluo and Randy will be relatively disadvantaged.
As for the coordinated skills of the riding god war in the flash track, as mentioned earlier, it only depends on the attributes and buffs of the riding god/mecha being cast, and has nothing to do with other participating in the battle.
About the BUFF mechanism of the magical account role/special role
In Zero Bi, Tio’s normal attack depends on her STR and the enemy’s ADF, but is not encouraged by the bonus of this type of STR BUFF. You can receive bonuses from ATS BUFF, such as the blessing of the magician, and settle on STR.
In the trajectory of the flash, the basic attack of the magical account is also based on the ADF of STR and the enemy, but it can receive the bonus of STR BUFF, not the bonus of ATS BUFF.
Of course, the combat skills of all magical damage of these characters are still based on the ATS and the enemy's ADF, which receive the bonus of ATS BUFF, but not the bonus of STR BUFF. Some of their non-magical damage combat skills (including part of Tio's combined combat skills and some of Miao Jie's combat skills) are based on the DEF of STR and the enemy, and receive the bonus of STR BUFF, but not the bonus of ATS BUFF. .
The normal attack of the special character Flash 2 chapter Alfin (LINK attack) and the Serenu of Flash 4/Chuang is a special attack magic instead of physical attack (similar to sending a wind wheel or fire arrow as a normal attack) , Look at our ATS and the enemy ADF, receive the bonus of ATS BUFF, but not the bonus of STR BUFF. The mechanism of action of all related calculations is similar to the combat technique of magic damage.
The peculiarity of Sora no Trail FC
空之轨迹FC中,由于没有单独设定ATS/ADF相关的BUFF,因此虽然魔攻魔防和物攻无方是两种属性,但在BUFF机制上却是统一的。助威+20%STR,实际对魔法也会有影响,造成ATS属性也有加成,加成值是STR基础值的20%。同样斗魂的-50%DEF,对于敌人的ADF也有效,也会造成ADF降低值为DEF基础值的50%。所以在FC中,这两个技能堪称神技。并且我们可以知道一般我方的STR远大于ATS,敌人的DEF远高于ADF,因此在ATS/ADF上的影响值如果按照STR/DEF算的话,相比后作类似的技能强度还要大。可以说不仅仅是一举两得,甚至多得的部分还是大幅度增强过的。从SC开始,物理和魔法的BUFF就分开了。
The same BUFF coverage mechanism
For Trajectory of the Sky, if a buff of a certain attribute is already applied, and another skill of the same attribute buff is used, the latter will overwrite the effect of the former; if a DEBUFF of a certain attribute is already applied, use If you have another skill with the same attribute DEBUFF, the latter will overwrite the former effect; if you have already used a BUFF with a certain attribute and use the DEBUFF skill with the same attribute, you will have both states at the same time, and vice versa. in this way.
Example 4: Jin first went to Dragon Magic 2 and obtained STR/DEF+60%, and then Xiao Ai cast a cheer, then Jin's STR BUFF was covered by the cheer and became STR+20%/DEF+60%.
Example 5: Kevin gave an enemy a guided force stop ADF-50%, Ling used the disaster shock wave with ADF-30%, and the final enemy’s DEBUFF was ADF-30%.
For trails of zero, trails of blue, trails of sen 1, trails of sen 2, some buffs have two types of low intensity and high intensity (the common attributes are 25% and 50% respectively). Continuous casting of the same kind of BUFF will have the effect Superimpose, the two small composites are large, and take the longest remaining duration. When the negative and positive are superimposed at the same time, the final effect is calculated according to the difference, which may be positive/negative or offset. For Shining Trail 3, some BUFFs have three types of strength, low, medium, and large (15%/30%/45% for attack and speed attributes, and 25%/50%/75% for defense attributes). When they are cast multiple times, and There are only two intensities for the cumulative calculation of BUFF and DEBUFF, the stacking effect and the longest duration. However, there is a different skill, Divine Power, which first removes the low ability and then BUFF, so the negative effects will be directly removed and stacked according to the positive BUFF.
The BUFF stacking and DEBUFF stacking conditions of SEN No. 4 are similar to those of SEN No. 3, and both are the superposition calculation of three intensities. However, the difference is that in Shining Track 4, there can only be one type of BUFF and DEBUFF of the same attribute. If you get BUFF first, DEBUFF will not work. If you get DEBUFF first, BUFF will not work. Only special skills such as high elevation and sacred power that can clear DEBUFF can remove DEBUFF and add the corresponding BUFF. Therefore, in the battle of SF4, the importance of good BUFF at the beginning of the battle is self-evident.
Example 6: In a BOSS battle, our side is attacked by enemy combat skills, and the DEF and ADF attributes are reduced. At this time, when our side casts the new moon mirror magic (DEF/ADF rises, the magic is reversed), only the magic can be obtained. The counter-effect, the defensive rise effect cannot be obtained, and the DEBUFF with the DEF and ADF falling is maintained.
BUFF duration
In the trajectory of the sky, the duration of BUFF/DEBUFF is calculated according to AT. Therefore, the BUFF disappears quickly in the early stage of the battle due to our low SPD, but it can last for a long time in the later stage of the battle. And in the BUFF at the same time, all the characters BUFF almost disappeared together. For characters like Richard with tough combat skills and strong action ability, BUFF can play a role in many rounds.
In the track of zero and the track of Bi, the BUFF and DEBUFF time are counted according to the rounds, and they will end after a fixed number of rounds. The driving and casting of the magic takes 1 round respectively.
In the trajectory of the flash, the setting of the zero bi is used, but the magic only consumes the round time when it is cast, the driving round does not consume the BUFF, and the BUFF is no longer required to be frequently refilled due to the flow of magic in the battle.
AT Rewards for Attributes
There will also be STR UP10%, 50% and other rewards in the rewards in the AT column. If the attack is released in the current round, the calculation will be based on the total value of the character's STR attributes when there is no BUFF, and corresponding bonuses, such as STR.
Example 6: Lloyd's 40-level 334STR in the trail of zero, in which the original STR is 143, the weapon is 180 STR, and the attack 3 gains 12 STR. Burning Heart increases STR to 143×50% rounded = 71. STR 50% reward increases STR to 334×50%=167. In the final calculation, STR is calculated according to 334+71+167=572.
It is worth mentioning that the actual effect of STR UP10% in FC is 20%, and the reward of STR UP is also valid for ATS (the calculation method is that ATS increases the percentage of the total value of STR).
Attack bonus
Attack bonus refers to the additional bonus based on attack attribute value when calculating damage. Mainly include: skill correction, S skill level correction, S skill 200CP correction, chain/TEAMRUSH combat skill sequence bonus, attribute effective bonus
Skill modification:
Each magic, skill, including attack cuisine, has its own additional attack power modifier compared to normal attacks. The LINK advanced skills (super counterattack, instant pursuit, etc.) in the flash track also have a correction value. The relevant value can be queried through the data sheet of this site.
S skill level correction
Only limited to the trilogy of Sora no Trajectory, the S skill damage has a certain bonus according to the character's level.
200CP correction
Only limited to the trilogy of Trajectories in the Sky, the bonus effect of the S skill 200CP is reflected in the attack bonus, specifically (skill correction + level correction) × 200CP correction magnification, 200CP correction magnification is 1.5 times.
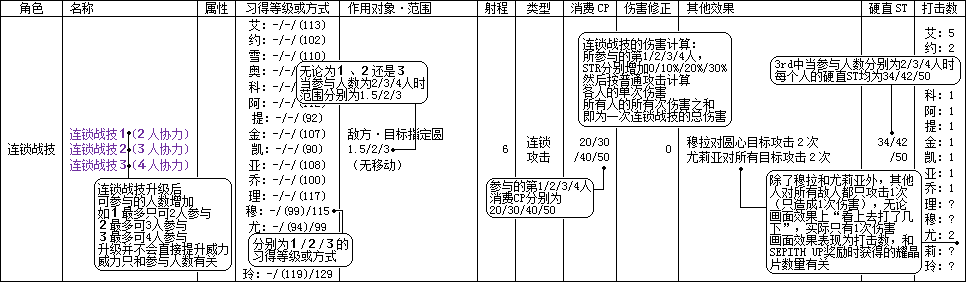
Chain/TEAMRUSH combat maneuver sequence bonus
Participating team members No. 1 to 4 get the skill modification of the chain/TEAMRUSH combat technique respectively, and the value is 0, 0.1, 0.2, 0.3 times the naked value of the attack attribute. In the trail of zero/bi, when TEAMRUSH rewards, after attacking together, this bonus will continue until the end of the battle, and it will be effective against combat skills and magic.
Attribute efficiency bonus
According to the effective multiplier of the enemy's attributes, the attack is increased or reduced according to the multiplier.
Calculate the attack attribute and attack bonus together to get the final attack power value, combined with the enemy's final defense power, and use it for the subsequent damage calculations. The final defense here refers to the defense value of the basic attributes of the attacked DEF/ADF after the BUFF/DEBUFF is settled (calculated with reference to the method introduced in "Basic Attributes and BUFF Calculation").
For the Trilogy of Trajectories in the Sky:
Final attack power = [Attack power after calculating BUFF and AT rewards + chain skill correction + (skill correction + S skill level correction) × S skill 200CP correction multiplier] × attribute efficiency, because they are all additions, so BUFF in the air track Priority is given to the effect of a single burst output, and the most important thing is the accumulation of multiple consecutive outputs. And because the enemy offensive is fierce under the high difficulty of the air track, it is necessary to squeeze out the attack round while defending, so in the air track, driving hard and short small magic and small skills will be more popular in various senses, and the S skill is generally reserved for the enemy's blood. The ultimate means to solve the problem quickly in a few stages, to avoid long nights and many dreams.
For the trail of zero/flash:
Final attack power = (attack power after calculating BUFF and AT bonus + chain skill modification) × attribute effective rate × (skill modification ÷ 100), here is divided by 100 and not rounded, calculated with decimals, the same below.
For Bizhi’s trajectory, effective skill corrections are introduced. Based on the original skill corrections, a certain discount will be generated according to the enemy’s attributes. It can be understood that when your attack attribute is too low in response to enemy defenses, the damage effect of your skills is again A discount is calculated as follows:
If skill modification <= 100, then effective skill modification = skill modification;
If the skill modification> 100, then the comparison of the previous enemy and friend attributes of the settlement skill modification will be investigated. If (attack power after calculating BUFF and AT bonus + chain skill modification) × attribute effective efficiency >= final defense power, then effective skill modification = skill Amend
If (attack power after calculating BUFF and AT rewards + chain skill modification) × attribute effective efficiency <final defense power, then effective skill modification =(Skill Modification-100) × (Attack Power after Calculating BUFF and AT Reward + Chain Skill Modification) × Attribute Effectiveness ÷ Final Defense Power + 100
Final attack power = (attack power after calculating BUFF and AT rewards + chain skill modification) × attribute effective rate × (effective skill modification ÷ 100)
Example 1: Lloyd's STR naked value is 747, the total value is 2179, Randy's STR total value is 2396, the final DEF 3218 before the nightmare sister takes off the mask, Lloyd opens the Burning Heart II.
When you put Burning Fury III on Seventh Sister, the attack power after calculating the BUFF and AT rewards is (2179+2396)÷2 + 747×50% = 2661
Because non-attribute combat skills have no attribute efficiency, 2661<3218, the skill modifier of 340 needs to be discounted, effective skill modifier = (340-100)×2661÷3218+100 = 298, final attack power = 2661 × (2.98 ÷100) = 7929
Damage buff/reduction
The previous final attack power, combined with the enemy's defense, can be calculated to get the basic damage. First, the basic damage calculation method is:
k1 × final attack power-k2 × final defense power.
k1 and k2 are coefficients, both are 3 in the empty track FC, 3 and 2.5 in the empty track SC/3rd, and 2.5 and 1.25 in the zero/bi/flash track. For force magic, the k1 of some games is 1.2 times the base value, so the k1 of the path of the sky FC (excluding EVO) is 3.6, the k1 of the path of the blue (including EVO) is 3, and other works are magic and physics. There is no additional bonus.
Damage gain/reduction refers to the factors that increase the damage due to the influence of various circuits and systems in the game on the basis of this basic damage, mainly including:
Damage gain/reduction loop impact
The damage gains of core circuits and ordinary circuits, such as sage, knight, overbearing, 3/4 thor and scorpio, the law of the body/spirituality of the air rail, and the iron wall and heraldic of ½ of them: Since the critical strike is an additional calculation of damage rewards, the circuit where the critical strike damage increases is inconsistent with the type of the damage gain circuit here, and the stack calculation is not performed here. Although Scorpio writes that the damage increases when the enemy is in a collapsed state, but The actual test and Thor belong to the same kind of circuit. It is the same as Thor’s conditional damage gain mechanism. It is judged that the enemy’s state is established, and the damage gain will be increased, instead of the additional 20% damage reward for the enemy in the standard state of collapse. Make improvements.
In addition, in addition to the revolution/waterfall that smoothly increases the damage gain rate according to the level difference, and the random increase of the snake, the rest of the gain loop with an unfixed rate of increase basically presents a curve of difficulty first and then easy. For example, the core loop knight of Bizhi’s trajectory, the 5th level knight’s upper limit of 100% damage gain can only be achieved when the HP is 1. If the HP is half, the damage gain is not 50% but 25%. When HP30% is around, the damage gain is 50%. That is, the more it does not match the condition of the loop boost, the more limited the boost, and only when the condition is closer to the condition can it quickly increase to the maximum gain value.
In the case of wearing multiple gain loops in the trail of sen, you can see the description of the loop in the trail 1 of sen is how many times the damage becomes. The calculation method of the damage gain of multiple loops is loop multiplier = (loop 1 multiplier × loop 2 Magnification×……), because there are no multiple gain loops in Bizhi's trajectory, and the loop description is how many times it is, it can be used as the same calculation method as Shanzhi's trajectory 1 by default;
The description of the loop in the track 2/3/4 is the percentage increase in damage. The calculation method of multiple loop damage gain is loop multiplier=(1+loop 1 gain+loop 2 gain+……).
Rune multiplier (Victory, Storm, Mercy)
The unique rune system of Jade's Track allows the damage received by a certain multiplier to be increased or reduced.
Explosive LINK amplification skill multiplier (magic amplification, amplification enhancement II)
The increase in physical damage is 1.2 times in the state of Birail Explosion. Different levels of Magic Amplification in Flash Rail 2 have gains on magic damage, and the physical damage caused by Amplification Enhancement 2 has gains. Note that it is only available when OverRise is enabled for two characters with connection level LV7. Normal OverRise does not have a damage gain effect. .
Command magnification
For the instructions of the damage increase type and the damage reduction type of the trails 3 and 4, the instruction multiplier = (1± instruction percentage).
The basic damage will form complete damage after the above-mentioned buffs/reductions. The calculation method is summarized as follows:
Complete damage = base damage × circuit multiplier × rune multiplier × explosive LINK amplification skill multiplier × command multiplier
Of course, this damage value will add a certain positive and negative random disturbance after the above calculation (usually no more than 7%), except for FC EVO, there is no random disturbance factor.
Example 2: In the previous example where Lloyd and Randy attacked the Seventh Sister, the final attack power = 7929, and the base damage = 2.5×7929-1.25×3218=15800. Among them, Lloyd brought the knight, 1 blood, and opened the victory rune. , Burning Fury III in the Explosive state, then complete damage = 15800 × 200% (1 blood knight) × 150% (Victory Rune) × 120% (Explosive Spirit) = 56880 ± 3792 (random)
Damage rewards, special coefficients and HP final deduction of damage calculation method
200CP damage bonus factor
Limited to zero/bi/flash, for zero/bi/flash 1/flash 2/flash 4, 200CP has a damage bonus of 50%, and for flash 3 it is 150%. It's just that the rewards of Flash 3 and Flash 4 are calculated based on basic damage, while Zero/Bi/Flash 1/Flash 2 is calculated based on full damage. Therefore, it can be seen that because the complete damage is increased by the loop and command, in the flash 4 200CP only provides the basic damage of 50%, and its effect is greatly weakened, and the flash 3 has made some compensation by the coefficient of 150% to a certain extent. The effect of 200CP is more obvious. In the later stage, due to the perfection of the circuit, the bonus is not as good as flash 1 flash 2.
Critical damage bonus factor
Basic Reward 50% + Core Circuit Critical Damage Reward
Critical strikes can be obtained through AT rewards/stealth (definitely critical strikes), the probability of the attack itself, critical strikes (weapon critical strike rate + circuit critical strike rate + skill critical strike rate), and commanded probability critical strikes. The crit of the attack itself and the crit of the command are triggered separately. For example, the weapon crit rate is 5%, the loop crit rate is 25%, the skill crit rate is 20%, and the command crit rate of the Asian repair is 50%: the crit rate of the attack itself is determined first. , There is a probability of 5%+25%+20%=50% to trigger; if there is no trigger, then the critical strike of the command is determined, and there is another 50% opportunity to trigger. Therefore, the overall crit rate is 1 – [1-(5%+25%+20%)]×(1-50%) = 75%.
Collapse reward coefficient
When the enemy is in a collapsed state, it has an additional damage bonus of 20%, based on the basic damage calculation
For the empty track, HP total damage = complete damage × (1 + critical damage bonus coefficient)
For zero/bi/flash 1/flash 2, total HP damage = complete damage × (1 + 200CP damage bonus factor) × (1 + crit damage bonus factor), you can see that Flick 2 is the most shining and hot era of crit , Not only can hit BP, but also under the increase of Cong Yun, due to the multiplier increase based on the full damage, the burst damage is very high. It is especially suitable for players such as the Philippines who have stealth and must burst in one week as the first output candidate, and the stability is high. hurt.
For Flash 3 / Flash 4, HP total damage = complete damage + 200CP damage bonus coefficient × basic damage + critical damage bonus coefficient × basic damage + collapse bonus coefficient × basic damage, Flash 34 has a certain degree of weakening to the burst. Especially because the role of the command system to join the BP greatly affects the battle situation, so the main role of the crit is reflected here, and the damage is weakened.
Example 3: In the previous example of Lloyd and Randy attacking the Seventh Sister, the Burning Fury III released by Lloyd stealth, because of the crit, the HP final damage = (56880±3792)× (1+50%) = 85320 ± 5688
In the final calculation of HP deducted damage (that is, when the value displayed on the game panel), in addition to the total HP damage calculated above, there are some special coefficients that need to be considered.
Special coefficient
Special coefficientMainly include: Stand up guard/persistence reduction factor, Riding God war defense action reduction factor, High-rise damage reduction factor (0.5), damage setting factor of different game difficulty (only for flash/track part games, except for attribute values In addition to the ratio itself, there are also additional ratios for enemy-to-friend damage). When multiple conditions are met, these coefficients are multiplied to get the final coefficient.
Therefore, HP final deduction of damage = HP total damage × special coefficient;
Example 4:In normal difficulty, the HP deduction for the final damage caused to the enemy in the high state is 0.5 times the total HP damage calculated above.
Sunder Armor Damage
The BREAK armor piercing slot is introduced in the flash rails 3 and 4. After the armor piercing slot is empty, the enemy can enter the collapsed state, thereby gaining various advantages. The gain factors for Sunder Armor damage are as follows:
Skill Sunder Coefficient
You can inquire in the magic combat technique data table on this site.
Circuit Breaking Armor Damage Bonus Coefficient
Including the future of the core circuit, the ordinary destruction circuit, etc. The damage bonus coefficient for the conditional defensive core circuit is the same as the damage gain/reduction circuit. The more mismatched the condition of the circuit promotion is, the more limited the bonus is. Only when the closer the condition is, it can be quickly increased to Maximum bonus value. The coefficients of multiple loops are superimposed and calculated.
Sunder Armor Command Bonus Coefficient
Sunder Armor commands have an additional bonus to Sunder Armor damage.
Unbalanced bonus factor
When the attack is out of balance, the current attack will increase the damage of 50%.
Continuous/burst attack bonus factor
When casting continuous/burst attack, there is an additional damage bonus for sundering. Please refer to the in-game help manual. For example, in Flash 3, the two bonuses are 400% and 900% respectively.
High bonus factor
When the enemy is high, the armor damage is increased by 200%
The calculation of armor sunder is as follows:
Armor Breaking Damage = HP Final Damage* (1 + Skill Armor Breaking Coefficient + Loop Armor Breaking Damage Bonus Coefficient + Armor Breaking Command Bonus Coefficient + Unbalanced Bonus Coefficient + Continuous/Burst Attack Bonus Coefficient + High Rising Bonus Coefficient)
Afterword: In fact, from a personal point of view, from the perspective of balance, I think the most unreasonable part of flash 3/4, because such a setting causes a good armor-piercing hand to be a good hurting hand. In fact, from the perspective of gameplay, the role functions should be diversified, so a role like Macias that is suitable as an armor-breaker cannot be played under the current system. Unless it is calculated separately from the previous damage bonus type and the defensive bonus type, for example, the calculation of the armor-piercing damage is based on the basic damage and the armor-piercing gain, so that you can create characters with different positions.
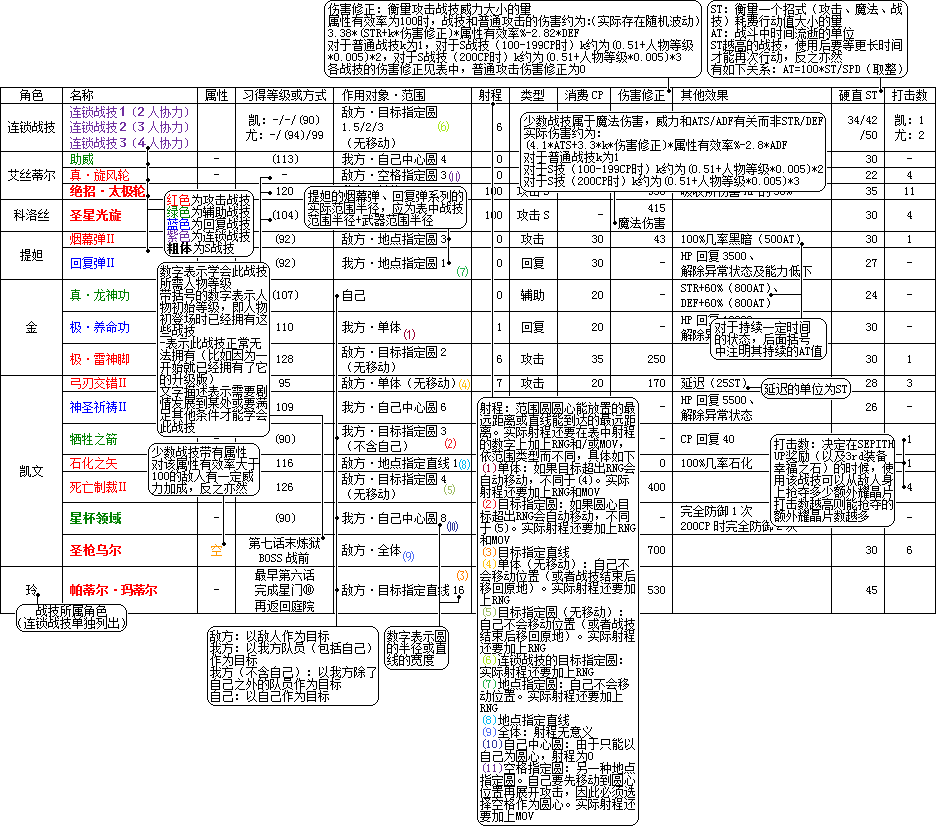
Part 3: Skill cast distance and location
Everyone knows that when the character's normal attack weapon RNG reaches the enemy, it will attack on the spot. If it cannot reach it, it will move to a nearby reachable location to launch an attack. The actual attack range is MOV+RNG. This is a typical scenario and is generally described in the common attack section of the help manual.
In fact, the calculation method of the range of the skill is similar to this. The skill itself has its own range and range, but according to the cast action of the skill (divided into situations where there is no need to move/or return to the original position to cast, such as the shadow, and the need to move In the case of casting), the actual casting distance should also consider adding the RNG of the weapon to the range, or RNG+MOV. The range of skills used on oneself can be considered as 0, magic and S skills are unlimited, and skills that penetrate straight to the farthest can also be considered unlimited range.
For skills with a circular range, the range covered by the cast distance is the farthest distance that the center of the range circle can be placed, and the range of the skill determines the radius of the circle;
For skills with a straight-line range, the range covered by the cast distance is the farthest distance that a straight line can reach, and the size of the skill's range determines the width of the straight line.
In some works, if the weapon is not a single attack but a range attack, it can affect the range of the skill, such as the Tida in the empty track, and the gun Yuna in the flash track 4.
Example 1: The Dragon Claw Slash in the blue track has a range of 8. It attacks the enemy’s target at designated circle 2. There is no movement in the skill attack. Lixia’s weapon RNG is 2, MOV is 7, and the actual release distance is 8+2=10. Enemies on any square within 10 distances of Lixia can be selected as the center of the circle, and units within the range of 2 are hit.
The description of the scope of skills is divided into several situations, which are discussed separately below:
Single body (no movement)
Cast on a single body, and will not move the position (or move back to the original position after the end). The actual cast range is the range of the skill + RNG. For example, intelligence analysis.
Target designation circle (no movement)
Choose the center of the circle to cast the skill, cast it on the center and surrounding units, and you will not move the position (or move back to the original position after the end). The actual cast range is the range of the skill + RNG. For example, Dragon Claw Slash.
Location designated circle (no movement)
Choose a specific location to cast the skill, cast it on the area around the center of the circle at the specified location, and you will not move the position (or move back to the original position after the end). The actual cast range is the range of the skill + RNG. For example, absolute zero.
Target designated straight line (no movement)
The direction of the straight line is determined by the self and the selected target. It usually attacks all units in the direction of the straight line from the self to the edge of the map. When selecting a target, you can only select targets within the cast range. The actual cast range is the skill's range + RNG. For example, Yanlong impact.
Location designated straight line (no movement)
The direction of the straight line is determined by the self and the selected location. Usually, it is to attack all units in the direction of the straight line from the self to the edge of the map. The range is meaningless. For example, Brave Shattering.
Single body (mobile)
For a single cast, the target will automatically move if it exceeds the skill range + RNG. The actual cast range is the range of the skill + RNG + MOV. For example: Yanblade Arrow.
Target designation circle (moving)
Select the center of the circle to cast skills, and cast on the center and surrounding units. If the center of the target exceeds the skill range + RNG, it will automatically move. The actual cast range is the range of the skill + RNG + MOV. For example: energy ring, beam slasher.
Space to specify circle (moving)
You must first move to the center of the circle and then cast the skill (the center of the circle must be an empty position and can be seated). The actual cast distance range has nothing to do with the firing range and RNG, depending on the empty position that your MOV can cover. For example, flashing teeth.
Location designation circle (moving)
Select the specified location to cast the skill, and cast the specified location to the area around the center of the circle. If the selected range exceeds the range + RNG, it will automatically move to a location near the specified location to cast the skill to the target area. The actual cast range is the range of the skill + RNG + MOV. For example, Karma hit, red leaf cut.
Space to specify a straight line (move)
The direction of the straight line is determined by the self and the selected location. Attack all units covered by the straight line from the self to the selected location and move to the specified location. The selectable location (that is, the length of the straight line) is determined by the skill range, and has nothing to do with MOV/RNG. For example, death storm.
Location designated straight line (moving)
The selected location determines the end point of the straight line, and attacks enemies near the selected end point within the straight line connecting the self and the end point (the length range is determined by the skill range). If the range of the skill cannot be covered to the selected end point, it will be moved to a covered position and then cast. Therefore, the actual cast distance is the skill's range + MOV. For example, arc light sword.
Oneself
Only cast on yourself, with a range of 0. For example, harmony of spirit and spirit.
Self-centered circle
Since you can only take yourself as the center of the circle, the range is 0. For example, chants.
All
Cast on all objects, the range is meaningless. For example, all S techniques.
Chapter 4: Special Content
Write whatever you think of.
Decision of avoidance
First judge the absolute avoidance (the thief clone), then determine the absolute hit (must hit skills, stealth), and then determine the hit rate (the percentage of the value in brackets on the right of the DEX, plus the influence of the mind and eye BUFF), if the hit is not triggered, the role avoidance rate is determined (The percentage of the value with brackets on the right side of AGL, plus the effect of avoidance rate, heart and eye and other BUFF), if it is still not triggered, determine the avoidance rate provided by ORDER, if it is not triggered, then generate random numbers within the respective size ranges of DEX×5 and AGL Make a size comparison to determine. The increased evasion of the auxiliary magic in Zero Bi is to increase the evasion rate (which can be superimposed with the evasion rate attribute of the character). The early version of the air track trilogy PC version of the guard of the wind increases the value of AGL+50, so the FC is more useful. SC/3rd chicken ribs. The SC and 3rd of the PSP/PS3/Steam version increase the avoidance rate of 25%. General S skills have absolute hits, but there are exceptions, such as Wiseman’s different-dimensional purgatory in the air track, Lucy Aola’s illusion and flame hell, the ultimate zero-type double destruction laser cannon, and the flash 4 middle school sister is the opponent. When the S. Some combat skills have absolute hits, such as FC's Juying, Magic Eye, Precision Shooting, Spiral Blade; SC 3rd's Precision Shooting I, II, and III. The enemy has many combat skills with absolute hits, such as the Swordmaster’s Hundred Strikes, Lightning Strikes, Sundering Armor Breaks, Sword Emperor’s Zero Storm, Demon Joasim’s Thunder Whip, and Ground Bullets.
For more detailed research, please see https://tieba.baidu.com/p/1245371543?red_tag=0836709017 .
Mindful
Increase the evasion rate and hit rate of 50% (which can be superimposed with the character's evasion rate attribute), and have a higher chance of playing an imbalance effect. Darkness: Increases the MISS probability of about 70% when attacked by the attacker, and the probability of avoidance when attacked is also affected (the specific impact mechanism is unknown), and the darkness can be removed with the mind.
Sword flash
The percentage of incidental base attack damage is used as additional damage, which is better than nothing. This BUFF is more a symbol of the strong, and the effect is not very obvious in the combat system.
Disrupt balance and fragility
Disturbing the balance increases the imbalance index of various attack attributes by 1 star, making it easier to be out of balance. Fragility increases the effectiveness of all schools of magic (it is invalid for advanced attribute magic such as Lost Magic).
Collapse
When it collapses, flash 3 is delayed by 25AT, and flash 4 is delayed by 10AT, which has nothing to do with the enemy or the SPD. During the collapse, the attack must be unbalanced, and there will be an additional damage of 20%×base damage, and the action can only be done in the next round after the collapse. The one that caused the collapse could not trigger the imbalance, and the effect of obtaining item rewards such as the coat of arms for the collapsed enemy was judged to be the one that collapsed, not the one that was killed.
delay
The delays of flash rails 3 and 4 are fixed AT and have nothing to do with SPD. In the previous games of Flash Rail 3, the skill delay was hard and straight, and the final delay AT was obtained after calculating with the enemy's SPD.
The imbalance of riding god war
Depends on the number of unbalanced stars in the attack site. Generally speaking, four stars can ensure that critical strikes and combos must be triggered, otherwise there may be several situations such as hitting but not triggering critical strikes, being blocked, and being dodged to counterattack. My initial guess is that the number of stars determines the probability of hitting and triggering a crit combo. The four stars are 100%. Take Flash 3/4 as an example: One star will have four situations: evasive counterattack, blocked, hit but not trigger crit combo, and hit and trigger crit combo. Personal guess is each type of 25%; Block, hit but not trigger crit combo, hit and trigger crit combo, the probability of hit and trigger crit combo is less than 50%, the other two are 25%; Samsung will not be dodged and blocked , Must hit, the probability of triggering a crit combo is 75%, and the probability of not triggering is 25%; a four-star 100% hits and triggers a crit combo. Since the 3 star +25% critical strike bead does not necessarily explode, the guessing probability cannot be superimposed. The critical strike and imbalance should be determined separately. If the crit strike occurs, the critical strike bead can definitely hit and trigger the critical strike combo, which can increase the accumulation The chance of BP and reduces the chance of being blocked/counterattacked. For opponents who have been at a low star, Crit Orbs can indeed solve problems that often fail to trigger combos (such as Black Knight), but because the probability is not superimposed. It is a multiplication, and in terms of income, it can only be said that it is worth a try.
The number of rounds of the command
The number of command rounds is to calculate the number of our actions, so if it is a defensive command, try to cast it before the enemy's turn in the last action that can be controlled by the player. In the offensive category, attention should be paid to minimize the rounds that are consumed by some 0-hard skills (such as sword dance, spirit and energy, burning heart).
Burning Heart/Sword Dance (Flash 3-4)/Meditation
After the last round of these 0AT combat skills, an additional round of abnormal status will be inserted, and they can be played again in the last round before the end to continue the effect. If CP>100 and you don’t want to continue, you can also burst S at the end of the last round (S-Break Failed will be triggered immediately), so that the rigidity of the last round of action + the time of one round penalty will be 1 round of S Instead of technical rigidity, it can only be said that losses can be reduced.
Special mechanism for core circuit upgrade
When the Flash Rail 3 core circuit is upgraded, the character will be filled with CP. This may be a BUG, which can be used during Lien Chan.
Taurus/Weaving/Domineering
Judgment on Taurus, weaving (running) core circuit and overbearing, etc.:
Flash 1-3: Ordinary pursuit is a basic attack, enjoy the bonus of Taurus, weaving (running), the first ordinary pursuit will also consume dominance and enjoy the bonus; counterattack and other high-level pursuits (instant pursuit) are considered special skills , Will not consume domineering, nor enjoy the Taurus, weaving (running) bonus.
Flash 1: Auxiliary combat skills will also consume overbearing.
Flash 4/Creation: All counter-attack pursuit types are not normal attacks, do not consume dominance, and do not enjoy the bonuses of Taurus and weaving (running).
Weird Thieves Status
Fattening: -70%SPD, CP-20, the magic range is reduced, the MOV is halved (the MOV here means that the total value of the MOV is halved with equipment)
Decrease: STR/DEF decreased (-50%), magic range decreased, MOV halved (same as above)
It can be solved with healing techniques and healing medicine.
Turban belt
The turban increases the amount of CP increase when attacking and being attacked (for example, the increase in CP becomes 1.5 times and 3 times respectively). The effect of increasing CP when attacked is similar to that of the lion (king) of Shining 3. Two headscarves with the same name have only one effect, and different names can have an effect at the same time, and continue to double according to the magnification on the basis of the first one. Therefore, when wearing two headscarves at the same time in the empty track, when using the S skill to hit 7-8 units, you can save up to 100CP, forming an infinite S. It is worth noting that when an attack triggers a critical strike, it will reduce the acquisition of CP, and sometimes it will affect the above tactics.
The belt is a fixed increase of a certain number of points every round, which is similar to Vulcan's CP recovery effect every round. Also, only belts with different names can be superimposed.
LINK non-offensive skills trigger chance
Divided into two types: Class A and Class B: Class A is generally related to HP, such as those with HP recovery and guarding. Generally, when the LINK level is upgraded from level 2 to the top level, the trigger probability is basically between 10% and 20%. Growth, but when the HP is lower than 20%, the probability will be 4 times; for the remaining Class B LINK skills, the general LINK level is upgraded from level 2 to the top level, the trigger probability basically grows from 30% to 50%.
Skill additional effect, skill mandatory effect
Most of the skills are to attack first and then add additional effects, including buffing the enemy in various states and flashing the black teeth of Yoshua. However, the effect of clearing all favorable conditions is to be activated first, and then attacked. For example, the Moon Shadow Silver Wolf, the Li Shifeng of the Blue Rail Wind Sword, and Li En's Infinite Sword, can first break the wall and destroy the demons and attack and damage. During the empty track period, there are also many bosses who have the ability to clear all advantageous states.
In addition, some BOSSs have some codes with mandatory effects, which may cause the attached abnormal state to ignore the accessories (for example, Wiseman has some attacks with mandatory chaos), or ignore the shields such as root barriers.
Gao Yang
The enemy is immune to most abnormal states and low abilities, including special states such as upper fragility and disturbed balance.
Appendix: Description of the Empty Orbit Magic Combat Skills Table